International Dot Day is on September 15th. It is a day that evolved from a story by Peter Reynolds called The Dot. The themes in this book encourage creativity, bravery and self expression. On Dot Day teachers and children are encouraged to “make your mark… and see where it takes you.”
I used Canva and Thinglink to create an interactive poster to use with my students when we explore Dot Day.
Have you ever celebrated Dot Day? How would you mark your mark? Please leave a comment sharing your thoughts.
After exploring and using the lovely clipart created by Bev Evans on her Posterous site (which will sady disappear when Posterous closes down) I also found her great videos about using the drawing tools in MSPublisher to create your own clipart and backgrounds.
I decided to show my grade 5/6 students this video and ask them to use the techniques to make their own avatars. Yes there are lots of online avatar creators but this is a great way to get your students exploring software and creating something unique.
You can use either MSPublisher or MSPowerPoint to make creatures like these. The gradient fill tools work slightly differently in each of these software packages and this can give slightly different end results.
You can use the page design tab in either piece of software to change the page dimensions.
For my students I created a template with the dimensions of the page already changed to a square shape so that they could focus on exploring the drawing tools. They could choose to use either the MSPublisher template or the MSPowerPoint template as their starting point. The other reason I chose to use a template was that I could restrict the size of the initial images because if our end result is as online images we do not need anything large.
Take a look at our class blog post to see some of their work. For using as an avatar we will save them as JPEGs but we are also going to make use of them in another way by saving the same image in a different manner. When my students have finished they can group all the objects together. They can then right click on the image and choose SAVE PICTURE AS. By doing this it will be saved as a transparent PNG file.
Meet Henry. My own try at following Bev’s great instructions.
A transparent PNG file could be used as a sprite in Scratch, as an animated object in a digital story or as a piece of clipart in a MSWord document. This becomes a way of showing my students that they can create unique clipart rather than using standard clipart.
During this activity we learnt about grouping objects, copying, pasting and flipping to create mirror images, layering, and editing the format of shapes via menus or via the edit points option. We became more proficient at moving from tab to tab within the software and with watching a small section of video before experimenting and then moving on.
By watching this one video we have learnt to use a commonly owned piece of software in a very different way. This is a great way to show our students that software can be adapted for many creative uses if we are willing to explore the possibilities.
How have you used MSPublisher or MSPowerPoint in a different way? Is there another piece of software you have used in a different way?
Both were written in 1999 but resonate with me greatly and it now 2011. I understand the value of clip art, templates and media libraries of images but feel that as teachers we are selling our students short if we do not encourage them to create and use their own artwork with digital media.
I like the value that is placed on the soul of the drawing by both authors. Our own artwork is unique and it adds our voice to our work.
I like the observations that much more can be learnt from drawing our own images in the discussions that may arise as we attempt our drawing. Incidental talk about the shapes, sizes and parts of the subject that we have chosen to draw. We have the chance to compare colours, observe lines and talk about textures.
Their own original image, imperfect as it may be, will communicate more about what they have to say than an image copied from someone else. Teach students to be confident in their ability to draw any image they need. Encourage them to develop “clip art” collections made up of digital copies of their own drawings.
How amazing would it be to have a Creative Commons licensed collection of “clip art” created by children for their classmates to use. Does it exist? Have I missed finding something like this out there in our connected interwebs?
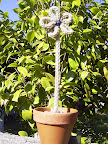
Plenty of web cruising happening and ebbs and flows of creativity. Problem with that is then I really wish for a group of children to try out the idea with. Latest one had been with french knitting. I have always loved teaching my classes the age old tradition of spool knitting (also known as corking, french knitting) using a cardboard tube and 4 icy-pole sticks. Then I always have the dilemma of what to do with the metres and metres of cord created. A link to a site provided one answer – flowers. Noreen Crowe-Findlay has some very easy to follow instructions on how to create a flower bookmark using a fine piece of spool knitting. A little thinking and the larger pot version is created.
In my head I keep thinking that this would be a nice Mother’s Day Present or just a great display along the top of a cupboard or windowsill. The flower has a skewer poked through the middle of the stem and the pot is filled with scrunched up newspaper which can have skewers poked into it. The pot could simply be a milk carton creatively decorated. If it was too light and in danger of tipping over a little bit of weight could be added under the scrunched up newspaper. Of course there will still be children who want to make a piece of spool knitting long enough to wrap around a building or two.
Previously I have shown a class how to use a spool with about 16 nails to create a beanie for a pompom critter. This was for an idea I used about interpreting a 2D picture into a 3D model.
Wool craft has alway been a favourite of mine and is a great way of keeping little hands busy and nimble.