Apps for Both

Recently my school has been the lucky recipient of some iPad mini devices. It has been a steep learning curve as I deliberately chose to go down the Android path with my choice of personal devices.

As our school is already using many Windows desktops and laptops I was delighted when I discovered the Maths Learning Center website where they have some great free apps for iPad devices which are also available as web apps. The best of both worlds!
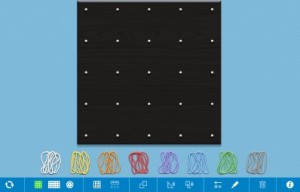
Screenshot of the web based app

The first app that we have been exploring in my ICT sessions has been the Geoboard app. It has captured the attention of most, if not all, of my students from Prep to Grade 6. Students initially used both the iPad version and the web based version to complete some open ended tasks. That was great as we definitely did not have enough iPad mini devices for everyone to use at the same time.

After using it to explore creating shapes through open ended tasks we moved on to designing quilt blocks. The open ended task cards that were in the TpT pack that I purchased were a great way to start exploring how the app worked. It would also be very useful when looking at area and perimeter.

I work with all classes within the school over two days and use a buddy system with the younger classes where 1/2 of one of the senior classes remains with a junior buddy class to help with some of the technical issues of saving and finding work. The other great benefit of the buddy system is the collaboration that occurs across grades.

We are now using the Geoboard app to create a new quilt for a very fussy Princess. I started out by telling each  class the story of The Princess and The Pea with a twist at the end. The germ for this idea came from a book called Traditional Tales with a Mathematical Twist written by Vince Wright. The students involved with collaborative creating were from our 1/2 classes and our 5 and 5/6 classes.

After hearing the story and being issued the challenge of designing a quilt for a very fussy Princess we used the Geoboard app to create an initial square design for our quilts.

Initial block created with the Geoboard app.

After finishing their design each student used the snipping tool to create a copy which was then pasted into MSPowerpoint. We were then able to use the picture tools, copy and paste and the rotate tool to create multiple blocks that were able to be joined together using the group function in the Picture Tools ribbon. The finished design could be grouped and saved as a picture.
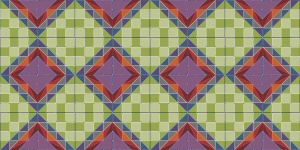
The finished design after manipulating in MSPowerpoint.

This is the first time that I have tried doing a fully digital version of the Quilt for a Princess idea. Previously I have use paper templates that we then copied and duplicated with a photocopier or scanned and manipulated for the students in MSPowerPoint using the edit background tool. It was great see all students have a go. The children were easily able to see the complexity of their design grow as they added more blocks by copying and pasting. Their designs can be seen on our shared school blog.

Some of the things we have learnt along the way are:

  • adding layers of rubberbands in the Geoboard app allowed us to create different depths of colour to our design.
  • that using the Windows snipping tool makes it very difficult to screen clip an exact square. MSPowerPoint comes the rescue in the picture tools by allowing us to remove the ‘lock aspect ratio’ tick to resize to a square and then lock the aspect ratio again. Squares tile much more easily.
  • in MSPowerPoint there is an INSERT SCREENSHOT button on the insert ribbon that could also be used to add the design from the Geoboard app. Once in MSPowerPoint it could be cropped before being resized and duplicated.
  • The group tool is a timesaving device. We could group 4 squares together and then copy and paste this. We could group rows together and then copy and paste this.
  • The view gridlines option was also helpful to line up our squares.
  • CTRL C and CTRL V got a good workout and one student found that CTRL click and drag was a great way to duplicate the initial square block.
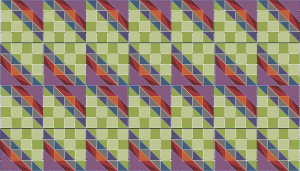
Same starter block - different design.
Same starter block – different design.

MSPowerpoint is not the only software that could be used to create the quilt design. It just happened to be the most convenient for my classes. It is also very good for showing students that an app or piece of software can have many uses depending on what you require as your end result.

Have you used the Geoboard app? How else might it support maths learning in your classroom? Please leave a comment sharing your thoughts.

Using the Software You Have

After exploring and using the lovely clipart created by Bev Evans on her Posterous site (which will sady disappear when Posterous closes down) I also found her great videos about using the drawing tools in MSPublisher to create your own clipart and backgrounds.

I decided to show my grade 5/6 students this video and ask them to use the techniques to make their own avatars. Yes there are lots of online avatar creators but this is a great way to get your students exploring software and creating something unique.

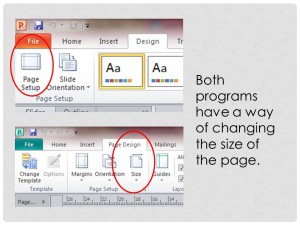
You can use either MSPublisher or MSPowerPoint to make creatures like these. The gradient fill tools work slightly differently in each of these software packages and this can give slightly different end results.

You can use the page design tab in either piece of software to change the page dimensions.

For my students I created a template with the dimensions of the page already changed to a square shape so that they could focus on exploring the drawing tools. They could choose to use either the MSPublisher template or the MSPowerPoint template as their starting point. The other reason I chose to use a template was that I could restrict the size of the initial images because if our end result is as online images we do not need anything large.

Take a look at our class blog post to see some of their work. For using as an avatar we will save them as JPEGs but we are also going to make use of them in another way by saving the same image in a different manner. When my students have finished they can group all the objects together. They can then right click on the image and choose SAVE PICTURE AS. By doing this it will be saved as a transparent PNG file.

Meet Henry. My own try at following Bev’s great instructions.

A transparent PNG file could be used as a sprite in Scratch, as an animated object in a digital story or as a piece of clipart in a MSWord document. This becomes a way of showing my students that they can create unique clipart rather than using standard clipart.

During this activity we learnt about grouping objects, copying, pasting and flipping to create mirror images, layering, and editing the format of shapes via menus or via the edit points option. We became more proficient at moving from tab to tab within the software and with watching a small section of video before experimenting and then moving on.

By watching this one video we have learnt to use a commonly owned piece of software in a very different way. This is a great way to show our students that software can be adapted for many creative uses if we are willing to explore the possibilities.

How have you used MSPublisher or MSPowerPoint in a different way? Is there another piece of software you have used in a different way?


Next Tip for Promethean Boards

This prezi was made to explain one way of creating name labels that can be used as objects in Activinspire. I have found that although I can create name labels as objects in Activinspire I have created better ones, that resize more easily, by using other software.

This method uses MSPowerPoint and MSPictureManager to create a set of objects with each student’s name on it plus an image. These can be dragged into yes/no surveys or sign in flipcharts.


One point that I forgot to mention in the Prezi is the universal suggestion when working with images, especially when resizing, and that is to use a copy of your originals rather than the originals themselves. If something goes wrong you can then just make another copy and try again. Simply copy the folder and paste it on your desktop or somewhere away from the originals.

I have also used Paintshop Pro and Inkscape to make labels but using the Save and Send JPEG option in MSPowerPoint or MSPublisher can be quite effective and is less intimidating for those just beginning to learn about manipulating images and using a combination of software to achieve an end point.

There would be other software that could be used in a similar fashion.

What would you use? Leave a comment to share your ideas.

Using Animoto

One of the online sites I discovered during my recent participation in the Edublogs Teacher Challenge was Animoto. It has fast become one of my favourites – particularly when I can combine it with MS Powerpoint’s ability to save slides as JPEG images. One of the spelling activities we do each week is called Word Of The Week. We choose one word to focus on and make as many spelling based observations as we can about that word.

By creating a template in Powerpoint it is very easy to create a new set of images about our word each week, upload them to Animoto and create a movie showcasing all the ideas about our word of the week. I can then embed this into our class intranet pages for my class to refer to at any time over the rest of the year. Our collection will grow week by week.

Exploring Pattern

My class and I have been exploring patterns. I used an idea from Traditional Tales with a Mathematical Twist by Vince Wright as my initial inspiration.

Do you know the story of  The Princess and the Pea? I told this to my class and changed the ending just slightly by having the Princess complain bitterly about the plain bedlinen as well as the pea. She was happy to marry the Prince as long as the pea was ditched and some nice quilts appeared for her bed.

Next we looked at a knitted blanket that had a repeated pattern and spent some time making patterns with some knitted squares that I had made. Each square was made up of two different coloured triangles. The inspiration for this came from Pat Ashforth and her knitted designs.

two colour square

In the next session we moved on to making some patterns with the same type of square using our Promethean whiteboard. I created a page with a grid and made a divided square, set it’s properties to drag a copy and restricted it’s rotation to 90 degree turns so that we could start with one square and add to it. I set the snap to grid property on the grid to make things nice and easy.

Slide1

We explored the number of different shapes that could be made with two and three divided squares.

Slide2

The next step was to look at making three different designs with four divided squares. The children did this on a gridded page and coloured them in. Once we had done that we moved on to repeating this design on a four by four grid by sliding or rotating our original design and adding colour again.

I collected all the designs and scanned the two by two grid and the accompanying four by four grid and added these to a Powerpoint presentation. Each design took up two slides to show the development of the pattern as it was repeated. Using the format background tool I tiled the four by four grid to show  how each design would look when it was repeated some more. Much easier than lots of repeated colouring in! As well as saving the Powerpoint presentation I saved each slide as an image so that I could explore some online tools.

I played with Animoto for the first time and used some of the designs.

It was easy to use and I am very happy with the end result.

We are also exploring this great online site from the Brooklyn Children’s Museum. There is lots to look at, read and a quilt designing game as well.

How have you explored pattern?

Using the PRTSC key

Got a nasty error message you want to ask your IT technician about or want to create a reminder or a how to poster then that wonderful PRTSC key is nice and handy.

PrintScreen

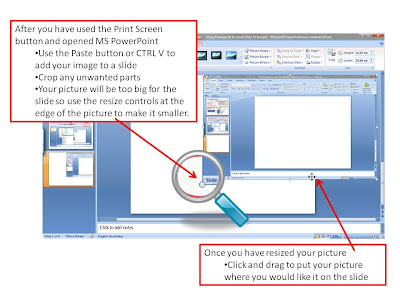
PRTSC – what a mouthful! It stands for Print Screen and it takes a handy snapshot of what you are looking at on your computer screen and holds it in the computer’s clipboard. Once it is held in your clipboard you can open up a program like MS Word or MS PowerPoint and use the PASTE command or CTRL V to add the screen snapshot to a page or slide.

What Can I do Next?

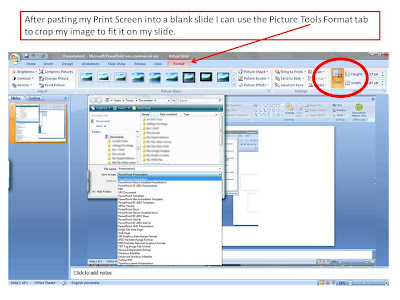
After pasting it into a slide I can crop it. Cropping will take out any extra bits you might not need.

After cropping, resizing and moving it around I can add a text box with an explanation or I can highlight part of my picture by adding a shape with transparent fill. I can cover parts of my picture with a filled shape or I can layer several pictures to add to my explanation. I can change just one thing on my screen and do a new PRTSC and add it to the next slide to do a step by step tutorial.

What Else?

One handy tip is to hold down the ALT key and press the PRTSC key and this will put just the window you are looking at into the clipboard. Useful if all you want is an error message – no need to crop.

Some computers will have another screen clipping tool. On computers using MS Windows Vista or 7 there is a program called Snipping Tool.

If you are using the snipping tool or PrintScreen to copy images from the internet you will still need to acknowledge the source of your image by copying the web address and adding to your work.

Creating Images for “How To’s”

A picture paints a thousand words is a saying I have often heard. A lot of the blog posts I have read in the Teacher Challenge about effective posts have all stated that pictures in posts can be very beneficial. They break up block of text and provide extra explanation.

I needed to use pictures in my post about creating a custom header. When I started the post I thought about what software to use for this. I even opened GIMP ready to use. I made my first screen capture using Printscreen and then paused. I have had GIMP loaded on my machine for a while but have not really used it…….. I do not have unlimited time to make my pictures…… Is there a different way……a way I might be more comfortable with?

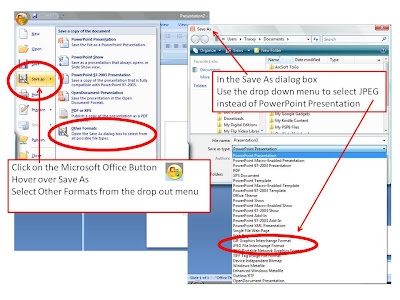
I remembered one of the IT technicians, who help me at work, creating an image for a teaching colleague using MS Publisher which is a program usually associated with words not images. He used the SAVE AS function to change the file format to JPEG and bingo he had a picture file instead. I then realised that the same thing could be done in MS Powerpoint. I am familiar with this software, I know where to find things quickly and I can save the individual slides as images but keep all the different images in the one slide show. Perfect, at least for me.

One day I will learn more about GIMP but for now using Powerpoint was quicker for me. I could also have used MS Paint but even in that I would be slower as I stumbled around the few menus to find what I needed. I could even have used ArtRage – the software I was writing about but it is an art program at heart and I needed a layout and explanation program.

This relates well to one of the things I feel very strongly about as a teacher. We need to give our students the skills to be able to think

  • this is what I want to do
  • what computer program or online tool or book or materials do I know/have that will help me to achieve this

If a new online tool or piece of software looks different we should be teaching our students the skills of finding out where things are. This might be a simple as thinking “There must be a way to save my work. Where is it?”

How do you approach a new online tool or piece of software?

What skills do you want your students to have when approaching a new online tool or piece of software?