Next Tip for Promethean Boards

This prezi was made to explain one way of creating name labels that can be used as objects in Activinspire. I have found that although I can create name labels as objects in Activinspire I have created better ones, that resize more easily, by using other software.

This method uses MSPowerPoint and MSPictureManager to create a set of objects with each student’s name on it plus an image. These can be dragged into yes/no surveys or sign in flipcharts.


One point that I forgot to mention in the Prezi is the universal suggestion when working with images, especially when resizing, and that is to use a copy of your originals rather than the originals themselves. If something goes wrong you can then just make another copy and try again. Simply copy the folder and paste it on your desktop or somewhere away from the originals.

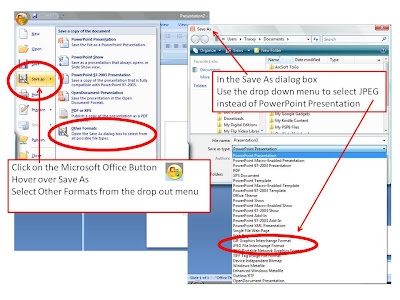
I have also used Paintshop Pro and Inkscape to make labels but using the Save and Send JPEG option in MSPowerPoint or MSPublisher can be quite effective and is less intimidating for those just beginning to learn about manipulating images and using a combination of software to achieve an end point.

There would be other software that could be used in a similar fashion.

What would you use? Leave a comment to share your ideas.

Missing Your Browsers Toolbox?

A Prezi with the steps to rediscovering your Browsers Toolbox if you think that it has disappeared. This is a quick tutorial for those just beginning with the Activinspire software that runs with a Promethean interactive whiteboard. Remember you can click on the enlarge button at the bottom right of a Prezi to watch it in full screen mode and then use the escape key to return to the embedded Prezi at the end.


What would you need to know if you were just starting out with exploring a new Promethean board? Please leave a comment with some suggestions.

ActivInspire Tips

At my current school we are using Promethean™ interactive whiteboards in our classrooms and this year we will have almost all teachers using a board with their class.

There will be staff at all stages of board use. Some at the very beginning, some having used SMART board™ interactive whiteboards and some having used their Promethean boards for a period of time. Part of my ICT role is to provide support for our staff as we learn to make the most of our interactive whiteboards.

I have started creating some Tip of Day images and will add them to posts here on my blog as they may be of use to others who are travelling the same learning curve.

Looking at the Browsers Toolbox


Looking at the Shared Resources Tab


Sometimes the Notes tab will have useful information
What would you find useful as a tip when starting to use a Promethean interactive whiteboard? Have you any tips to share? Please leave a comment.


ArtRage – Using Layers To Create A Simple Animation

In my last ArtRage post I wrote about being able to create the parts of your drawing out on separate layers. Each part of your drawing sits on its own piece of paper and the stack of papers show the whole drawing.

We can use the view layer function in the layers to hide parts of the drawing. This function is found in the layers panel. The layers panel is usually found on the left side of your ArtRage page but can be moved around.

The flower has all its parts when all the layers are visible but it is possible to have only some parts visible by toggling the layer visibility with the eye.

This can be a useful feature for creating animated stories. You can design all the artwork within ArtRage on different layers and then use the visibility toggle to create all the exported images you need  to have a flower grow its petals one by one or an arm move up and down. You can build up a set of images that contain the parts you need for each animation by toggling the visibility of your layers in ArtRage. As you are always working in the one ArtRage drawing lining up the parts of your animation is easy.

Here is a quick sample movie with the flower growing one petal at a time.

There are special animating programs that can be used but I think that this is a good way to show students how complex animating can be. It is very similar to the old flip book that could be made from a stack of paper with a drawing in the corner that changed as you flipped through the pages.

How else might the layer visibility tool be useful for students in your classroom?

ArtRage – Using Layers

The Layer Panel In ArtRage 2

Imagine a stack of see-through paper that never ran out! The layers panel in ArtRage means that I can separate out parts of my drawing and use different parts of my drawing when I use the EXPORT AS IMAGE function.

You can create just one drawing but use only parts of this drawing for each image that you save.

Start a new drawing in ArtRage and choose the size paper you would like to use. See my earlier post about choosing paper size. Add just your sky to the first paper layer and then click on ADD LAYER in the layer panel to get a new piece of paper.

Add your hills or other background to this new layer and then click on ADD LAYER again. Your paint will not get mixed together because each part is on a separate layer.

Keep adding new layers as you build up your drawing. Remember to save your drawing as you go. It would not be good to lose your hard work if anything went wrong. Just use FILE, SAVE PAINTING and give it a good file name.

Why do I like layers so much?

  • It is easy to change the order of the layers by clicking on a thumbnail in the layer panel and dragging it up or down the stack.
  • If you make a big mistake you can delete just one layer and keep all the rest of your drawing safe.
  • Using the eye at the side of each layer thumbnail I can turn off (hide) parts of my drawing to export my drawing and then turn on (show) those parts again and export my drawing again.
  • I can copy a layer to repeat a design. I used this function to help me create my blog header.
  • I can resize or rotate a layer.

How would you use layers in ArtRage?

Leave a comment to help others.

ArtRage – What Size Paper Will I Use?

When you first start using ArtRage you tend to just open the program and start having fun with all the drawing and painting tools but…..

isn’t it better to think first about how you might use your creation once it is finished.

  • Do you want a banner, title or an avatar?
  • Is the drawing going on the web, being printed or added to a PowerPoint slide?
  • square or rectangular – which would be best?

ArtRage opens with a piece of ‘paper’ all ready to draw on and it will be the shape and size of your computer’s screen. This might not be what you need – or want – so to change this you will need to start a new painting by clicking on FILE – NEW PAINTING and changing some numbers.

Use the top part of the dialog box to change the size of your ‘paper’

The very important thing to remember is to click the OK button at the bottom of the dialog box when you have changed your ‘paper’ size.

ArtRage OK button

Now you are ready to go ahead and have some fun with all the lovely art tools, your unlimited supply of paint, pens, pencils, the stencils, palette knife and eraser.

Organizing and Editing Photos

I have always loved taking photographs ever since buying my first camera which was a Kodak Instamatic. I bought myself an SLR when I started working which was well used until it was traded for a film compact camera for travelling. When digital cameras arrived I wanted one but had to wait a while to be able to afford to buy one. I settled on a Ricoh Caplio G3 and I think it cost me around $600. I still have it and it is still used even though I now own a digital SLR.

Having had a camera for a while I have lots of photos. The ones before digital came along are all in boxes. I have some that are on mini floppy discs that I can no longer access because of the file format but luckily they were taken with a film camera so that I have the negatives. I have some on CDs and I have thousands on my computer!

Many pictures

I need a way to organize these or I would never find anything. I could have just used the Windows software that came with my computer or the software that was provided with my camera but instead I choose to use  Picasa.

Picasa is a software download from Google. It is free and I find it very useful because it ties in so well with my Gmail account, Online Picasa Web Albums and Blogger. To use my images in my blog I am able to easily find, edit and upload to my online albums and then use the link to feature to add to my blog.

One thing I use often is the crop feature in Picasa. I take my photos using the highest setting on my camera and that is way too large for using on the web. This means I can crop heavily and still have a large picture. Even with a zoom lens there are some things that you just can’t get close enough to to get a good tight shot.

Before

After

When I upload using Picasa I have the option of uploading the full sized image or just uploading a smaller file for the web and the the uploader takes care of the resizing.

I can use other programs to resize my image as well but if I do this I will always make a copy of my image first so that I do not ever resize the original. MS Picture Manager is one program that I use.

IrfanView is another picture viewer/editing downloadable program that is highly recommended but I have not explored it yet.

Using the PRTSC key

Got a nasty error message you want to ask your IT technician about or want to create a reminder or a how to poster then that wonderful PRTSC key is nice and handy.

PrintScreen

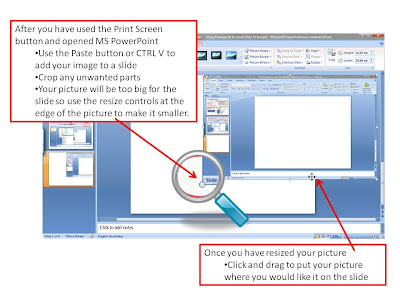
PRTSC – what a mouthful! It stands for Print Screen and it takes a handy snapshot of what you are looking at on your computer screen and holds it in the computer’s clipboard. Once it is held in your clipboard you can open up a program like MS Word or MS PowerPoint and use the PASTE command or CTRL V to add the screen snapshot to a page or slide.

What Can I do Next?

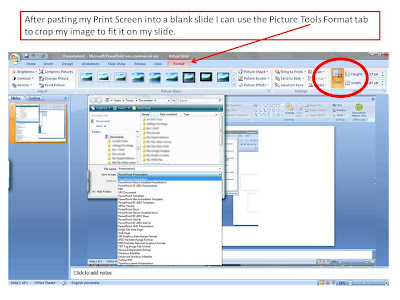
After pasting it into a slide I can crop it. Cropping will take out any extra bits you might not need.

After cropping, resizing and moving it around I can add a text box with an explanation or I can highlight part of my picture by adding a shape with transparent fill. I can cover parts of my picture with a filled shape or I can layer several pictures to add to my explanation. I can change just one thing on my screen and do a new PRTSC and add it to the next slide to do a step by step tutorial.

What Else?

One handy tip is to hold down the ALT key and press the PRTSC key and this will put just the window you are looking at into the clipboard. Useful if all you want is an error message – no need to crop.

Some computers will have another screen clipping tool. On computers using MS Windows Vista or 7 there is a program called Snipping Tool.

If you are using the snipping tool or PrintScreen to copy images from the internet you will still need to acknowledge the source of your image by copying the web address and adding to your work.

Creating Images for “How To’s”

A picture paints a thousand words is a saying I have often heard. A lot of the blog posts I have read in the Teacher Challenge about effective posts have all stated that pictures in posts can be very beneficial. They break up block of text and provide extra explanation.

I needed to use pictures in my post about creating a custom header. When I started the post I thought about what software to use for this. I even opened GIMP ready to use. I made my first screen capture using Printscreen and then paused. I have had GIMP loaded on my machine for a while but have not really used it…….. I do not have unlimited time to make my pictures…… Is there a different way……a way I might be more comfortable with?

I remembered one of the IT technicians, who help me at work, creating an image for a teaching colleague using MS Publisher which is a program usually associated with words not images. He used the SAVE AS function to change the file format to JPEG and bingo he had a picture file instead. I then realised that the same thing could be done in MS Powerpoint. I am familiar with this software, I know where to find things quickly and I can save the individual slides as images but keep all the different images in the one slide show. Perfect, at least for me.

One day I will learn more about GIMP but for now using Powerpoint was quicker for me. I could also have used MS Paint but even in that I would be slower as I stumbled around the few menus to find what I needed. I could even have used ArtRage – the software I was writing about but it is an art program at heart and I needed a layout and explanation program.

This relates well to one of the things I feel very strongly about as a teacher. We need to give our students the skills to be able to think

  • this is what I want to do
  • what computer program or online tool or book or materials do I know/have that will help me to achieve this

If a new online tool or piece of software looks different we should be teaching our students the skills of finding out where things are. This might be a simple as thinking “There must be a way to save my work. Where is it?”

How do you approach a new online tool or piece of software?

What skills do you want your students to have when approaching a new online tool or piece of software?