What I Have Learnt So Far

I am really enjoying the Teacher Challenge. I am finding out many things about setting up and maintaining a blog, about getting involved with the conversations and good tips for to use with my students.

  • Pages were a mystery that I had not even thought about but they make perfect sense after reading Sue’s excellent explanation on Monday
  • Replying to comments is vital – not just good manners as that is how you start the conversations.
  • The focus of a blog may shift over time and this is fine.
  • Read, re-read and then re-read some more before you click the post or reply button.
  • Slow down and check your typing.
  • Following the conversations in the Discussions Questions section of the Teacher Challenge blog had been frustrating me until this morning when I worked out how to add the feed for each of the individual question’s comment thread to my Google Reader. Up until then I only had the feed for the new questions coming through and not the comments.
  • Getting a blogging culture going in a classroom or school will take time and you can do it a step at a time.

I am very appreciative of the time and effort that has gone in to setting up this challenge. It reinforces, for me, the positive aspects of being part of an internet connected community.

Creating Images for “How To’s”

A picture paints a thousand words is a saying I have often heard. A lot of the blog posts I have read in the Teacher Challenge about effective posts have all stated that pictures in posts can be very beneficial. They break up block of text and provide extra explanation.

I needed to use pictures in my post about creating a custom header. When I started the post I thought about what software to use for this. I even opened GIMP ready to use. I made my first screen capture using Printscreen and then paused. I have had GIMP loaded on my machine for a while but have not really used it…….. I do not have unlimited time to make my pictures…… Is there a different way……a way I might be more comfortable with?

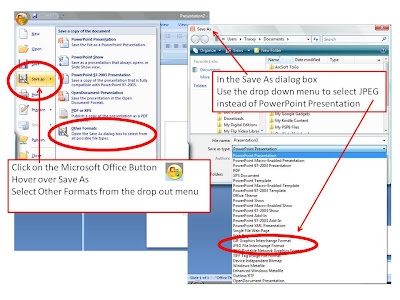
I remembered one of the IT technicians, who help me at work, creating an image for a teaching colleague using MS Publisher which is a program usually associated with words not images. He used the SAVE AS function to change the file format to JPEG and bingo he had a picture file instead. I then realised that the same thing could be done in MS Powerpoint. I am familiar with this software, I know where to find things quickly and I can save the individual slides as images but keep all the different images in the one slide show. Perfect, at least for me.

One day I will learn more about GIMP but for now using Powerpoint was quicker for me. I could also have used MS Paint but even in that I would be slower as I stumbled around the few menus to find what I needed. I could even have used ArtRage – the software I was writing about but it is an art program at heart and I needed a layout and explanation program.

This relates well to one of the things I feel very strongly about as a teacher. We need to give our students the skills to be able to think

  • this is what I want to do
  • what computer program or online tool or book or materials do I know/have that will help me to achieve this

If a new online tool or piece of software looks different we should be teaching our students the skills of finding out where things are. This might be a simple as thinking “There must be a way to save my work. Where is it?”

How do you approach a new online tool or piece of software?

What skills do you want your students to have when approaching a new online tool or piece of software?

Creating A Custom Header Using ArtRage Pro for Edublogs

Warning – Long Post with Images

With a little nudging from Miss W I have tried to put together a post about how I created my custom header. I used a program that I love called ArtRage. The version I used is called ArtRage Studio Pro but I could also have used ArtRage 2 or ArtRage Studio. For more information about ArtRage go to the Ambient Design site.

Why do I like it so much?

  • It does such a brilliant job of letting me use tools that are just like real life painting tools for a very cheap price
  • I never run out of paper
  • I never run out of paint, crayons, glitter, textas, pencils ……..
  • Nobody ever growls at me for making a mess
  • Creating with art materials is so much fun
  • I can create my own original artwork for use online or in documents
  • I can show my students that they can create their own art to use in digital stories, headers and projects just as I would if they were doing their work away from the online world. I still acknowledge that sometimes it is quicker to use clip art or find someone else’s image and attribute where the image came from.

Step One

Before you start using ArtRage you need some information from your Edublog Dashboard about the pixel size you are able to use for your Custom Header.

You will find that information under the Appearance Tab by clicking on Custom Header. This will open the page about custom headers and it will tell you the pixel size you can have for the theme you have chosen. Mine was 720 x 150 pixels.

Step Two

Open ArtRage and select New Painting from the File menu. A dialog box will open and you can change the pixel size of your painting. Click OK to close the dialog box.

Step Three

Your new painting will open and you can begin to create your header using all the art tools provided. For a really good introduction to ArtRage 2 visit this set of videos created by Judith Tramayne which is linked to from the tutorials page of the Ambient Design website. My pictures show the screen as seen in ArtRage Studio Pro where the layout is slightly different to ArtRage 2 as shown in the video tutorials.
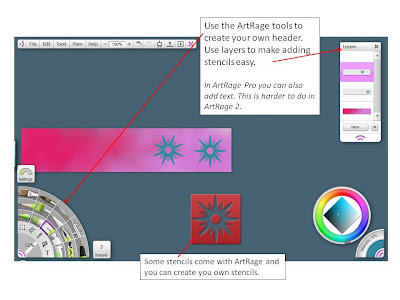
Play, have fun, explore layers and stencils, use lots of glitter and paint to come up with a unique header. I like creating colourful backgrounds by squeezing different colours from the tube tool and spreading it around with the palette knife. I use lots of layers to keep the different elements of my drawing separate in case I would like to change something later.

Step 4

The vital saving your work bit!

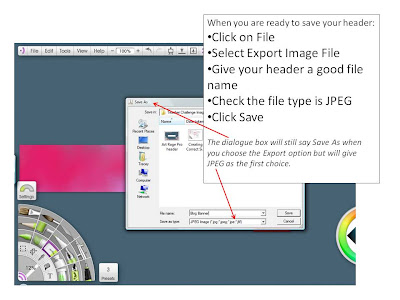
When you have finished playing and have a great header to add to your blog you will need to save it in a format that can be used such as a JPEG.

To do this you need to:

  • Click on File
  • Choose Export Image
  • Check that the file type says JPEG
  • Give it a good file name (to be able to find it later when you upload it)

After you have exported your header as a JPEG it is alway a good idea to save the painting in ArtRage’s own file format, PTG, so that you can easily change it at a later time. That is a easy as clicking on FILE, SAVE PAINTING and putting it in a safe place with a memorable file name to be able to find it again.

Step 5

Adding your Custom Header to your page is the last vital step. Sue Waters has created an excellent set of instructions for Edublog users to follow. Scroll down past the information about various themes to find them.

Step 6

Admire your hard work!

Thanks for reading this loooong post. It has definitely shown me how long a tutorial post can take to make and how frustrating it can be when trying to proofread what you have written. Please forgive any unintentional errors. I came across a great statement about admiring our successes on a blog called Huzzah. Take a look! I think that lots of class blogs should ask to borrow these very wise words.
30 Days to Kick Start Your Blogging Challenge

I have revisited my very neglected Edublog because of this great challenge. It is fantastic to have so many vibrant and enthusiastic mentors to encourage me in my blogging attempts. I enjoyed changing the theme of my blog and am finding my way slowly around the dashboard. I created a header using ArtRage and am reading my way through the comments on the first beginner challenge post before adding my own comment.

I have blogged personally with my daughter for several years now on a craft based blog (but she has grown older and lost interest so the posts on that one have almost died), blogged with a class on a closed blog on our school intranet and began blogging on Kidblog with a small group of students. It was very close to the end of our school year when we started our Kidblogs but I hope to get back to these in the new school year. From that statement about the end and start of the school year you may have worked out that I am a teacher in the Southern Hemisphere. I teach in a primary school in the south of Tasmania, Australia.

One of the hardest things I have found so far about blogging is knowing what to blog about and I think that is why myEdublog stayed neglected for so long. I hope that participating in the challenges will give me the kick start I need to keep it going this time.