A picture paints a thousand words is a saying I have often heard. A lot of the blog posts I have read in the Teacher Challenge about effective posts have all stated that pictures in posts can be very beneficial. They break up block of text and provide extra explanation.
I needed to use pictures in my post about creating a custom header. When I started the post I thought about what software to use for this. I even opened GIMP ready to use. I made my first screen capture using Printscreen and then paused. I have had GIMP loaded on my machine for a while but have not really used it…….. I do not have unlimited time to make my pictures…… Is there a different way……a way I might be more comfortable with?
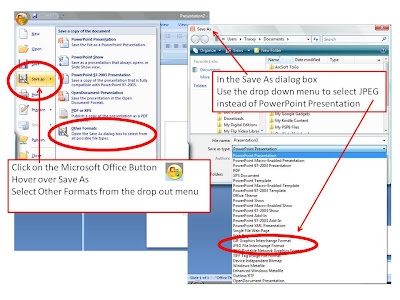
I remembered one of the IT technicians, who help me at work, creating an image for a teaching colleague using MS Publisher which is a program usually associated with words not images. He used the SAVE AS function to change the file format to JPEG and bingo he had a picture file instead. I then realised that the same thing could be done in MS Powerpoint. I am familiar with this software, I know where to find things quickly and I can save the individual slides as images but keep all the different images in the one slide show. Perfect, at least for me.
One day I will learn more about GIMP but for now using Powerpoint was quicker for me. I could also have used MS Paint but even in that I would be slower as I stumbled around the few menus to find what I needed. I could even have used ArtRage – the software I was writing about but it is an art program at heart and I needed a layout and explanation program.
This relates well to one of the things I feel very strongly about as a teacher. We need to give our students the skills to be able to think
- this is what I want to do
- what computer program or online tool or book or materials do I know/have that will help me to achieve this
If a new online tool or piece of software looks different we should be teaching our students the skills of finding out where things are. This might be a simple as thinking “There must be a way to save my work. Where is it?”
How do you approach a new online tool or piece of software?
What skills do you want your students to have when approaching a new online tool or piece of software?

Hi Mrs.S and thanks for commenting on my blog. I do think the processes and the outcomes are more important that the tools that are used, but you need to know what tools are available to achieve the effect or end product you are looking for. Have you tried the free program, Irfanview? You can crop, resize, rotate, add effects and create headers very easily with this program. I recommend it to all my students and use it every day, especially now I am doing the 365 (photo-a-day) project.
Are you participating in the teacher’s blogging challenge?
Yes, I am participating in the Teacher’s Blogging challenge. I have heard about Irfanview but have not tried it as when I was playing with photos a lot I used Paintshop Pro. Since then I have tended to use the tools in Picasa, especially with my home photos, if I need to adjust something before putting it online. I tend to use MS Picture Manager for resizing images at work – mainly because it was there and I was shown how to use it. We have so much choice these days in which programs we can use for a task.
I often use PowerPoint to edit pictures quickly. I particularly like the tool which lets you make a background transparent. It is an easy way to layer images effectively.
I think students need to be aware that there are a number of ways to do things and its true that we want them to think and then choose which is the best tool for the job.
Thanks for sending me searching for the transparent background tool. I could have some fun with that.