Warning – Long Post with Images
With a little nudging from Miss W I have tried to put together a post about how I created my custom header. I used a program that I love called ArtRage. The version I used is called ArtRage Studio Pro but I could also have used ArtRage 2 or ArtRage Studio. For more information about ArtRage go to the Ambient Design site.
Why do I like it so much?
- It does such a brilliant job of letting me use tools that are just like real life painting tools for a very cheap price
- I never run out of paper
- I never run out of paint, crayons, glitter, textas, pencils ……..
- Nobody ever growls at me for making a mess
- Creating with art materials is so much fun
- I can create my own original artwork for use online or in documents
- I can show my students that they can create their own art to use in digital stories, headers and projects just as I would if they were doing their work away from the online world. I still acknowledge that sometimes it is quicker to use clip art or find someone else’s image and attribute where the image came from.
Step One
Before you start using ArtRage you need some information from your Edublog Dashboard about the pixel size you are able to use for your Custom Header.

You will find that information under the Appearance Tab by clicking on Custom Header. This will open the page about custom headers and it will tell you the pixel size you can have for the theme you have chosen. Mine was 720 x 150 pixels.
Step Two
Open ArtRage and select New Painting from the File menu. A dialog box will open and you can change the pixel size of your painting. Click OK to close the dialog box.
Step Three
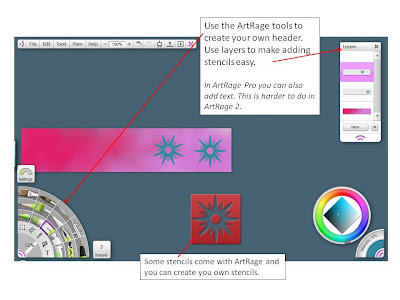
Your new painting will open and you can begin to create your header using all the art tools provided. For a really good introduction to ArtRage 2 visit this set of videos created by Judith Tramayne which is linked to from the tutorials page of the Ambient Design website. My pictures show the screen as seen in ArtRage Studio Pro where the layout is slightly different to ArtRage 2 as shown in the video tutorials.
Play, have fun, explore layers and stencils, use lots of glitter and paint to come up with a unique header. I like creating colourful backgrounds by squeezing different colours from the tube tool and spreading it around with the palette knife. I use lots of layers to keep the different elements of my drawing separate in case I would like to change something later.
Step 4
The vital saving your work bit!
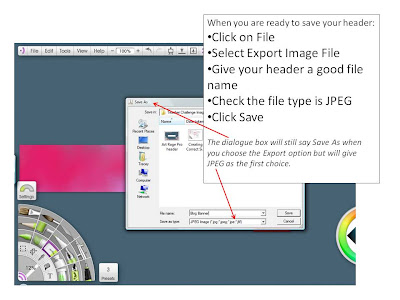
When you have finished playing and have a great header to add to your blog you will need to save it in a format that can be used such as a JPEG.
To do this you need to:
- Click on File
- Choose Export Image
- Check that the file type says JPEG
- Give it a good file name (to be able to find it later when you upload it)

After you have exported your header as a JPEG it is alway a good idea to save the painting in ArtRage’s own file format, PTG, so that you can easily change it at a later time. That is a easy as clicking on FILE, SAVE PAINTING and putting it in a safe place with a memorable file name to be able to find it again.
Step 5
Adding your Custom Header to your page is the last vital step. Sue Waters has created an excellent set of instructions for Edublog users to follow. Scroll down past the information about various themes to find them.
Step 6
Admire your hard work!
Thanks for reading this loooong post. It has definitely shown me how long a tutorial post can take to make and how frustrating it can be when trying to proofread what you have written. Please forgive any unintentional errors. I came across a great statement about admiring our successes on a blog called Huzzah. Take a look! I think that lots of class blogs should ask to borrow these very wise words.


I have just found this tutorial about creating a header using Picnik. The last part is written for Blogger users.
I found it through a link in one of the craft blogs I subscribe to using Google Reader. Finding great tutorial like this is one of the reasons I love Google Reader.
Just thought that it was wise to now add that Picnik is no longer available to use but the tutorial still has value in showing another way to create headers. PicMonkey maybe able to do the same thing but I have not explored it at all.
More generosity… amazing! These challenges sound so straight forward but when you visit all the different blogs you find the learning curve getting steeper and more fun all the time! Thank you so much for sharing your ArtRage magic. It is a really wonderful application – I worked with it last year and the kids just love exploring all the features. They taught me so much and so did you. Many thanks, Regards, Deb Hogg (Sydney, Australia)
Thank you, Deb. One of the great things about blogging is the exchange of ideas. I think this challenge has been great as it has given me the opportunity to look all the different ways teachers approach a task. Each time I visit a blog I can see how the blog author has tweaked a challenge to fit their voice and their teaching philosophy.
This is excellent!!! Wow! My students use ArtRage also, but I love the idea of having them create their own custom header! I am going to send them to your blog so they can learn how. Thank you for sharing!
I was very impressed with your student’s work. How long had they been using ArtRage?
I am wondering if your school uses ArtRage and if do you have a school site license? If you have an iPad Auryn Ink is a nice art app as well.
Yes, Lois, it is installed at the school. I have e-mailed you with a more wordy reply.
Thanks to the link to ArtRage. I really like nice paint programs so I will be checking this one out while I’m on holidays. I’ve used Gimp a couple of times but find it isn’t intuitive and very fiddly to get around all the menus where as this looks like a program that encourages creativity.
This is a great post for anyone wanting to customize their header.
cheers
Lois
I became an ArtRage fan as soon as I discovered it several years ago. I have ardently introduced it to as many people as possible ever since then. I love introducing it to children by telling them about the endless supply of paint in any colour and an unlimited supply of paper. I alway get a giggle from them when I say – “No-one growls at me for making a mess or for wasting paper.”
Chuckling Tracey at the ‘Warning – Long Post with Images”
Interestingly enough while you’ll read lots of posts that suggest short posts work better there is now a lot of evidence that say well written longer posts do just as well if not better.
The key regardless is what content you share and have you laid it out so that it is easier to read. You’ve done both well!
Thanks, Sue. I have very much enjoyed the Challenge so far. Coming up with the content is the biggest challenge for me and having a nudge from someone else is a good way to get an idea for a post.
Cute header! I made a custom header for my blog too, but I used GIMP, which looks definitely more complicated than this program. I’ll have to try it out sometime!
Your custom header looks great, Rachel. I have GIMP installed but have not explored it very much. I won a copy of Paintshop Pro 7 or 8 (now that dates me!) some years ago and loved using that but do not play around with editing photos as much these days. Artrage fills a very different spot to programs like GIMP as it is designed to mimic real life art tools. I am very enthusiastic about it – and no I am in no way connected to the group of people who created it – because of the creative possibilities it allows.
What a great post! I can only hope I will be able to create something like that soon. I have quite a ways to go!
Thanks very much. I am certain there would be other technologies where you would be way ahead of me. Your smart phone blog post reminds me of how little I know about mobile technologies – my phone is very basic! I have learnt a lot by playing and persevering.
Wow! Tracey, what a great post. I have not used Artrage and I think I might need to check it out before we go back to school.
Your how-to post is fantastic. Explains things so simply.
I know these can be helpful for new bloggers – one of my students had written a post about adding a pet to your blog. A teacher from NZ had been puzzling how to do just that and found the student post set out the steps really well.
Thanks, Sue. I am definitely a big fan of ArtRage.